CloudFormation
Define AWS infrastructure in Microtica with CloudFormation components, using index.json, microtica.yaml, index.js, schema.json, and component.yaml.
CloudFormation (CFN) components let you manage and deploy AWS infrastructure in Microtica. They integrate directly with the platform, so infrastructure deployment runs through your pipelines. Below is each key file in a typical CFN component.
File structure
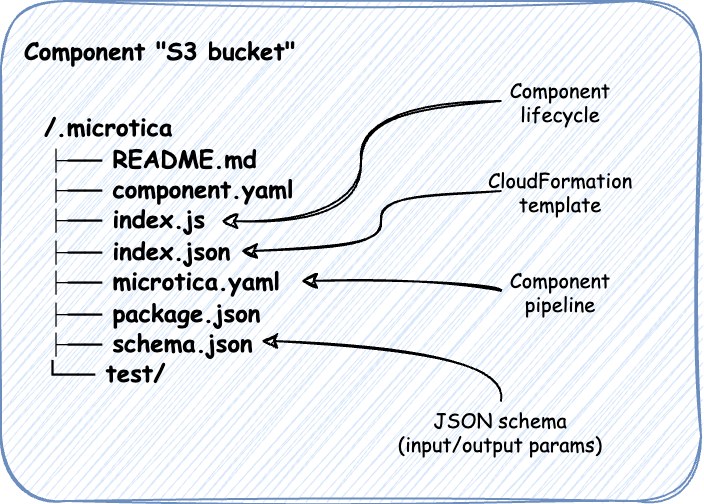
index.json
The index.json file is the core of your CloudFormation component. It defines the AWS resources to create or manage with CloudFormation.
{
    "AWSTemplateFormatVersion": "2010-09-09",
    "Description": "AWS S3 Bucket custom component",
    "Parameters": {
        "BucketName": {
            "Type": "String",
            "Default": "",
            "Description": "The name of the S3 bucket"
        }
    },
    "Resources": {
        "S3Bucket": {
            "Type": "AWS::S3::Bucket",
            "Properties": {
                "BucketName": {
                    "Ref": "BucketName"
                }
            }
        }
    },
    "Outputs": {
        "BucketName": {
            "Value": {
                "Ref": "S3Bucket"
            },
            "Description": "Name of the S3 bucket"
        }
    }
}- Parameters — defines the user-configurable inputs for the template. Here,
BucketNamelets users set the name of the S3 bucket. - Resources — where you define the AWS resources.
- Outputs — the outputs of the template. After deployment, the name of the S3 bucket is returned.
microtica.yaml
The microtica.yaml file lays out the CI/CD pipeline steps Microtica runs during deployment.
steps:
  Package:
    type: build
    title: Build app/resource
    commands:
      - npm install
      - npm test
      - npm prune --production

    artifacts:
        files:
          package_zip: ./.microtica/
          schema_json: ./.microtica/schema.json

    cache: false

  DeployComponent:
    type: deploy
    target: environment
    env_id: "env-123"
    partial:
        create_missing_resources: true
        resource_version_overrides:
          "ComponentName": "{{MIC_PIPELINE_EXECUTION_ID}}"
index.js
The index.js file is the entry point for managing the component's lifecycle in Microtica. It uses the Microtica SDK to interact with CloudFormation.
const path = require("path");
const { NestedComponent } = require("@microtica/component").AwsCloud;

const component = new NestedComponent(
    path.join(__dirname, "index.json"),
    path.join(__dirname, "schema.json"),
    handleCreateOrUpdate,
    handleCreateOrUpdate
);

async function handleCreateOrUpdate() {
    // Here you can specify additional properties which will be provided as input parameters
    // in the CFN template during deployment. These properties are used during the initial
    // resource deployment process.

    return {};
}

module.exports = component;
schema.json
The schema.json file defines the component's schema, specifying input parameters and making sure they match the expected structure and types. These input parameters appear in the Microtica Console, so users can configure the component at deployment.
{
  "$schema": "http://json-schema.org/draft-07/schema#",
  "$id": "schema://microtica/component-aws-s3.json",
  "title": "Component Schema",
  "type": "object",
  "properties": {
      "inputs": {
          "type": "object",
          "properties": {
              "BucketName": {
                  "type": "string",
                  "description": "The name of the bucket."
              }
          },
          "required": [
              "BucketName"
          ],
          "additionalProperties": false
      }
  },
  "additionalProperties": false
}
Place all the files above within the .microtica folder at the root of your Git repository.
component.yaml
The component.yaml file is the specification for a Microtica CloudFormation component. It provides metadata and configuration, including the name, description, and paths to the CloudFormation and schema files.
# Microtica component spec

name: comp
description: Microtica Custom component
spec:
  cfn_path: index.json
  schema_path: schema.json
For a full example, check out our complete template.
With this setup, your CloudFormation component is organized and ready to deploy through Microtica, so you can automate infrastructure management on AWS.
Custom input parameters
To make your CloudFormation templates more flexible and configurable, you can add custom input parameters. For the full walkthrough, see custom input parameters.
Step 1: Update the JSON schema (schema.json)
First, define the new AccessControl parameter in schema.json. This makes the parameter visible and configurable in the Microtica Console.
Here's how to update schema.json:
{
  "$schema": "http://json-schema.org/draft-07/schema#",
  "$id": "schema://microtica/component-aws-s3.json",
  "title": "Component Schema",
  "type": "object",
  "properties": {
      "inputs": {
          "type": "object",
          "properties": {
              "BucketName": {
                  "type": "string",
                  "description": "The name of the bucket."
              },
              "AccessControl": {
                  "type": "string",
                  "description": "The access control setting for the S3 bucket.",
                  "enum": ["Private", "PublicRead"]
              }
          },
          "required": [
              "BucketName",
              "AccessControl"
          ],
          "additionalProperties": false
      }
  },
  "additionalProperties": false
}
In this update:
- The
AccessControlparameter is added underproperties, with a description and two allowed values (enum): "Private" and "PublicRead". - The parameter is also added to the
requiredarray, so it must be provided during deployment.
Step 2: Update the CloudFormation template (index.json)
Next, update index.json to include the new AccessControl parameter in the CloudFormation template. This parameter sets the access control policy on the S3 bucket.
Here's the updated index.json:
{
  "AWSTemplateFormatVersion": "2010-09-09",
  "Description": "AWS S3 Bucket custom component",
  "Parameters": {
      "BucketName": {
          "Type": "String",
          "Default": "",
          "Description": "The name of the S3 bucket"
      },
      "AccessControl": {
          "Type": "String",
          "Description": "The access control setting for the S3 bucket.",
          "AllowedValues": ["Private", "PublicRead"],
          "Default": "Private"
      }
  },
  "Resources": {
      "S3Bucket": {
          "Type": "AWS::S3::Bucket",
          "Properties": {
              "BucketName": {
                  "Ref": "BucketName"
              },
              "AccessControl": {
                  "Ref": "AccessControl"
              }
          }
      }
  },
  "Outputs": {
      "BucketName": {
          "Value": {
              "Ref": "S3Bucket"
          },
          "Description": "Name of the S3 bucket"
      }
  }
}
In this update:
- The
AccessControlparameter is added underParameters, with allowed values "Private" and "PublicRead" and a default of "Private". - The
AccessControlproperty is referenced in theS3Bucketresource definition, linking it to the value provided during deployment.
Next steps
Components
Components are reusable infrastructure-as-code building blocks in Microtica, built with CloudFormation for AWS or Terraform for multiple clouds.
Custom input parameters
Add custom input parameters to a Microtica CloudFormation component by updating the schema.json and index.json files, shown with an S3 example.