Terraform
Define cloud-agnostic infrastructure in Microtica with Terraform components, using the microtica.yaml, main.tf, outputs.tf, and variables.tf files.
Terraform components give you cloud-agnostic infrastructure management in Microtica. You define and deploy infrastructure across multiple cloud providers using Terraform, a widely adopted infrastructure-as-code tool.
File structure
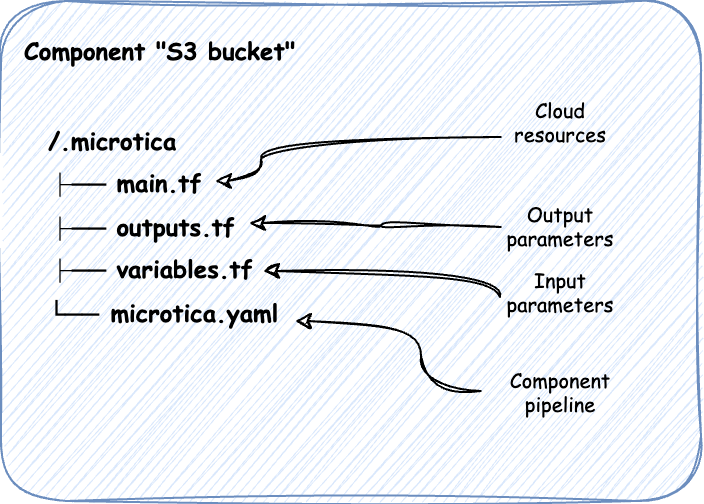
microtica.yaml
The microtica.yaml file defines the CI/CD pipeline for the Terraform component. It lays out the steps to build and deploy the component:
steps:
Clone:
  type: git-clone

Package:
  type: terraform-build

DeployComponent:
  type: deploy
  target: environment
  env_id: "env-123"
  partial:
    create_missing_resources: true
    resource_version_overrides:
      "ComponentName": "{{MIC_PIPELINE_EXECUTION_ID}}"
The pipeline first clones the component's source code from the Git repository, then builds the Terraform component so all the resources are ready, and finally deploys the component to the specified environment.
main.tf
The main.tf file is the primary Terraform configuration, where you define the infrastructure resources. Here's a simple example for an AWS S3 bucket:
resource "aws_s3_bucket" "my_bucket" {
bucket = var.bucket_name
}
This defines an S3 bucket. The bucket name comes from an input variable, so you can customize it at deployment.
outputs.tf
The outputs.tf file specifies the values Terraform generates after deployment. You can reference these outputs in other components:
output "bucket_name" {
value       = aws_s3_bucket.my_bucket.bucket
description = "The name of the S3 bucket"
}
Here the output returns the name of the created S3 bucket, making it available to other parts of your infrastructure or to Microtica's deployment process.
variables.tf
The variables.tf file holds variable definitions, which make configurations dynamic and reusable across environments:
variable "bucket_name" {
type        = string
description = "The name of the S3 bucket"
}
This defines the bucket_name parameter, used to set the name of the S3 bucket. Input parameters defined in variables.tf appear in the Microtica Console, so users can configure the component at deployment.
With this setup, your Terraform component is organized and ready to deploy through Microtica, so you can manage infrastructure across multiple cloud providers.
Custom input parameters
To make a Terraform component more configurable, you can add custom input parameters.
Step 1: Update the variable definitions (variables.tf)
First, define the new access_control variable in variables.tf. This lets users specify the access control setting when they deploy the component.
Here's how to update variables.tf:
variable "bucket_name" {
type        = string
description = "The name of the S3 bucket"
}

variable "access_control" {
type        = string
description = "The access control setting for the S3 bucket"
default     = "private"
validation {
  condition     = contains(["private", "public-read"], var.access_control)
  error_message = "Access control must be either 'private' or 'public-read'"
}
}
In this update:
- The
access_controlvariable is added, with a description and a default value of "private". - A validation block ensures the value is either "private" or "public-read".
Step 2: Update the Terraform configuration (main.tf)
Next, update main.tf to use the new access_control variable when defining the S3 bucket.
Here's the updated main.tf:
resource "aws_s3_bucket" "example" {
bucket = var.bucket_name
}

resource "aws_s3_bucket_ownership_controls" "example" {
bucket = aws_s3_bucket.example.id
rule {
  object_ownership = "BucketOwnerPreferred"
}
}

resource "aws_s3_bucket_acl" "example" {
depends_on = [aws_s3_bucket_ownership_controls.example]

bucket = aws_s3_bucket.example.id
acl    = var.access_control
}
In this update:
- The
aclproperty of theaws_s3_bucketresource is set to the value of theaccess_controlvariable, so the bucket's access control is configurable at deployment.
Next steps
Custom input parameters
Add custom input parameters to a Microtica CloudFormation component by updating the schema.json and index.json files, shown with an S3 example.
Assign a custom domain to a component
Assign a custom domain to a Microtica component from the Component Outputs section, with the SSL certificate and CNAME records handled for you.