Connect a container registry
Connect your own Docker registry to Microtica to store images built in pipelines and deploy them to Kubernetes. Supports DockerHub, Amazon ECR, and GitLab.
Connect your own Docker registries to Microtica to store the Docker images built during pipeline execution. You can then use those images to deploy services on Kubernetes clusters.
Microtica supports three types of private Docker registries:
- DockerHub
- Amazon ECR
- GitLab Container Registry
Connect your DockerHub registry
To connect a DockerHub registry, first create a personal access token from the DockerHub portal.
Go to your Account Settings and click the Security tab in the side menu on the left.
Click New Access Token to create a new access token. In the dialog, enter a name that distinguishes this token from others (for example, Microtica Pipelines).
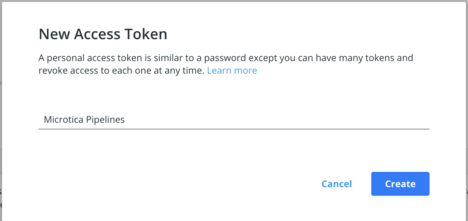
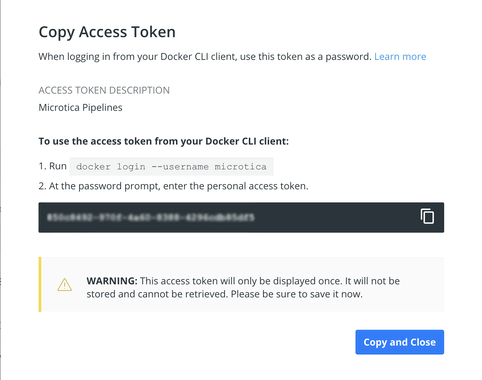
Click Create to generate the access token. Copy the token value to your clipboard — you need it in the next step.
Revoking access to DockerHub
To revoke access to your registry, deactivate or remove the access token in the DockerHub portal.
Finally, add the registry in the Microtica Portal. Go to Project Integrations → Container Registries.

Default registry
If you mark a registry as default, pipelines use it automatically whenever you don't specify a registry.
Connect your Amazon ECR registry
To connect an Amazon ECR registry, first create an IAM user from the AWS Console.
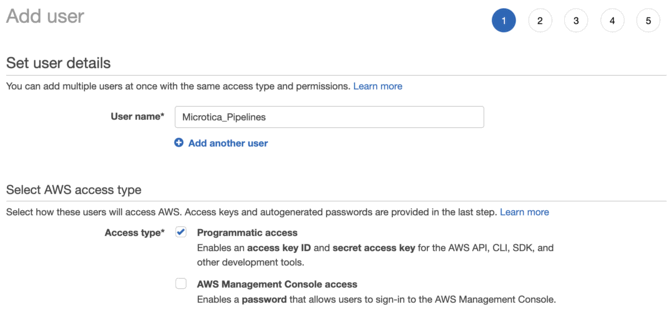
In the IAM console, choose Users and click Add User at the top left.
Choose a username for the new user, select Programmatic access for the Access Type, and click the Next: Permission button.
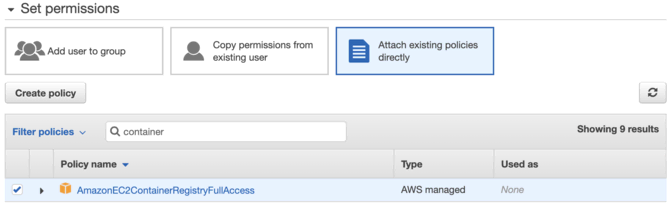
Now choose the permissions to assign to this user. In this case you only need access to the ECR service.
Select Attach existing policies directly and search for "container". Select the AmazonEC2ContainerRegistryFullAccess policy and click the Next: Tags button at the bottom right.
Follow the next step, then click the Create user button at the end.
New access keys are generated. Copy the key values to your clipboard — you need them in the next step.

Finally, add the registry in the Microtica Portal. Go to Project Integrations → Container Registries.

Choose a simple, memorable name when creating the registry. You use this name to reference the registry from pipeline steps. Enter the access key ID and secret access key from the AWS console.
Default registry
If you mark a registry as default, pipelines use it automatically whenever you don't specify a registry.
Connect your GitLab Container registry
To connect a GitLab Container registry, first log in to your GitLab account.
From the profile menu, go to Preferences, then choose the Access Tokens tab.
Generate a new token with the write_registry permission selected.
Finally, add the registry in the Microtica Portal. Go to Project Integrations → Container Registries.
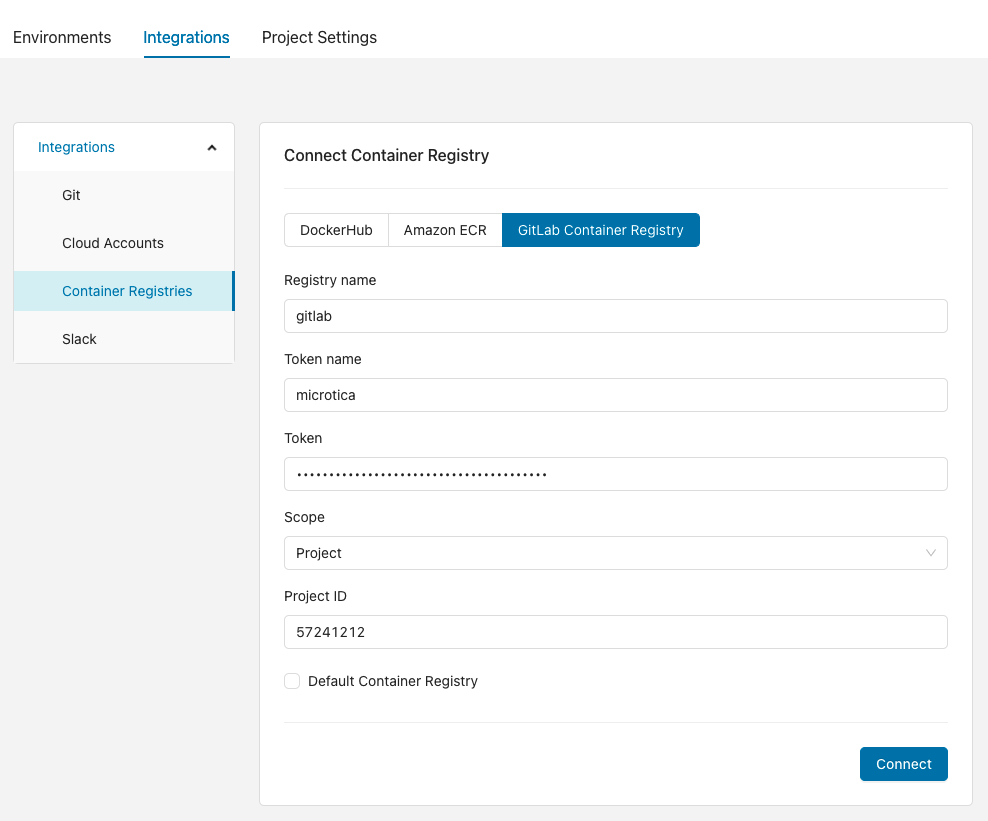
Choose a simple, memorable name when creating the registry. You use this name to reference the registry from pipeline steps. Enter the token name and token value from the GitLab portal.
Default registry
If you mark a registry as default, pipelines use it automatically whenever you don't specify a registry.
Next steps
Connect an existing Kubernetes cluster
Connect a Kubernetes cluster running on any cloud provider or on-premise to Microtica, and deploy to it with the full Kubernetes automation you already use.
Monitoring and cost
Monitor the health and performance of your cloud infrastructure and applications with Microtica, and optimize your AWS spending with cost reports.