Node.js
Deploy a production-ready Node.js backend on your own AWS account with Microtica, from a demo Kubernetes cluster to a self-hosted EKS setup in minutes.
Node.js is an open-source, cross-platform JavaScript runtime that runs on the V8 engine and is built for scalable backend applications.
Microtica offers a ready-to-use Node.js template as part of the Free templates pack. Deploy a Node.js application on the demo Kubernetes cluster to get started. When you're ready, self-host Node.js on your own AWS account and set up a production-ready solution in minutes.
One-click deploy
Click Deploy with Microtica below and follow the template steps to deploy your Node.js application on your AWS account.

1. Create an account
Creating a Microtica account is free. Sign up with your email or with your Git account.
2. Select the Node.js template

On the left side, a link points to the source code of this template on Microtica's GitHub account.
3. Create a Git repository
First, connect a Git account (GitHub, Bitbucket, GitLab, or CodeCommit). Microtica sets a default repository name for each template, which you can change. If you already have a Git account connected to Microtica, choose it from the list. Microtica creates a new repository on your account with the provided name, and every Git push deploys automatically.

If you already have Node.js application source code, follow the guide on how to import an existing application in Microtica.
4. Select a cluster
Next, choose the Kubernetes cluster where your application deploys. You have these options to run your container app:
- Create a new EKS cluster on the spot.
- Connect an existing cluster.
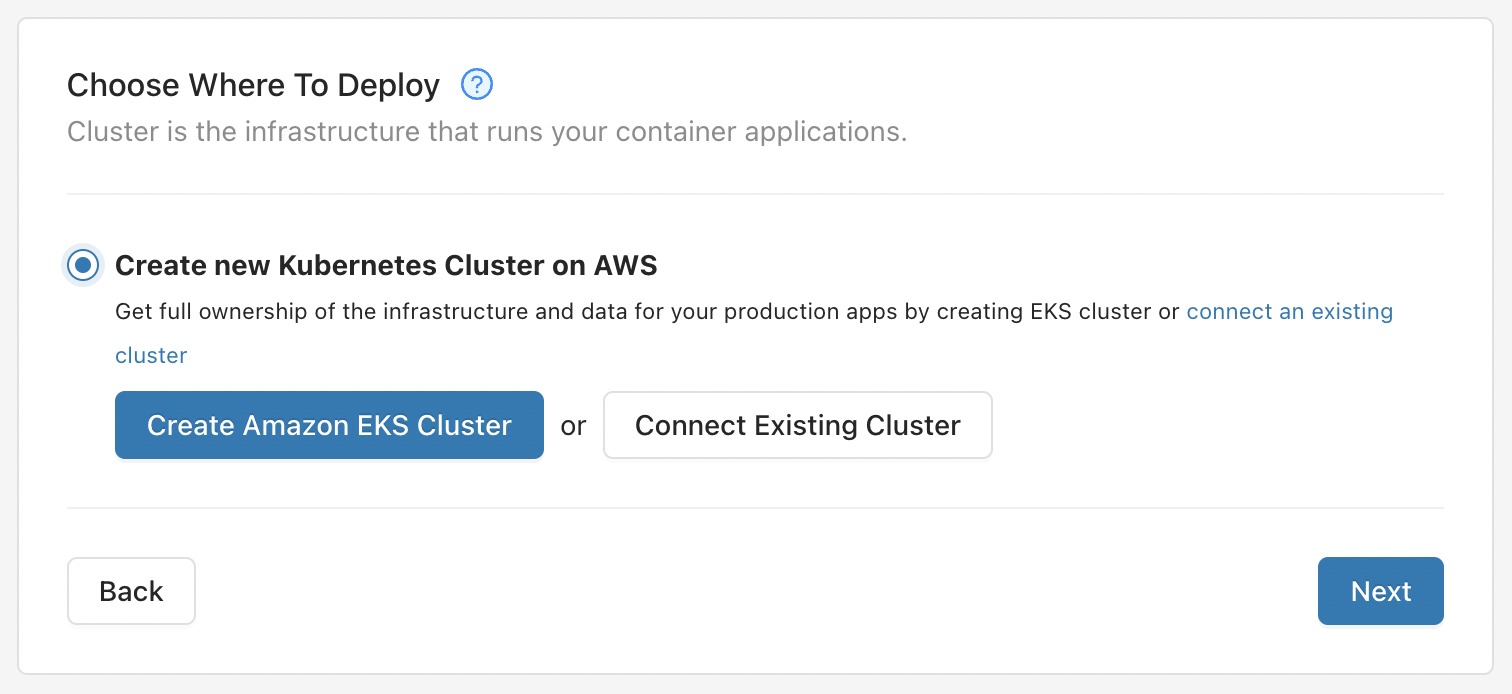
4.1. Create a new EKS cluster on the spot
To deploy your Node.js application on your own AWS account, create an AWS-managed Kubernetes (EKS) cluster by clicking Create Amazon EKS Cluster.
This is the recommended option for production applications, as it gives you full ownership of your cloud infrastructure and applications.
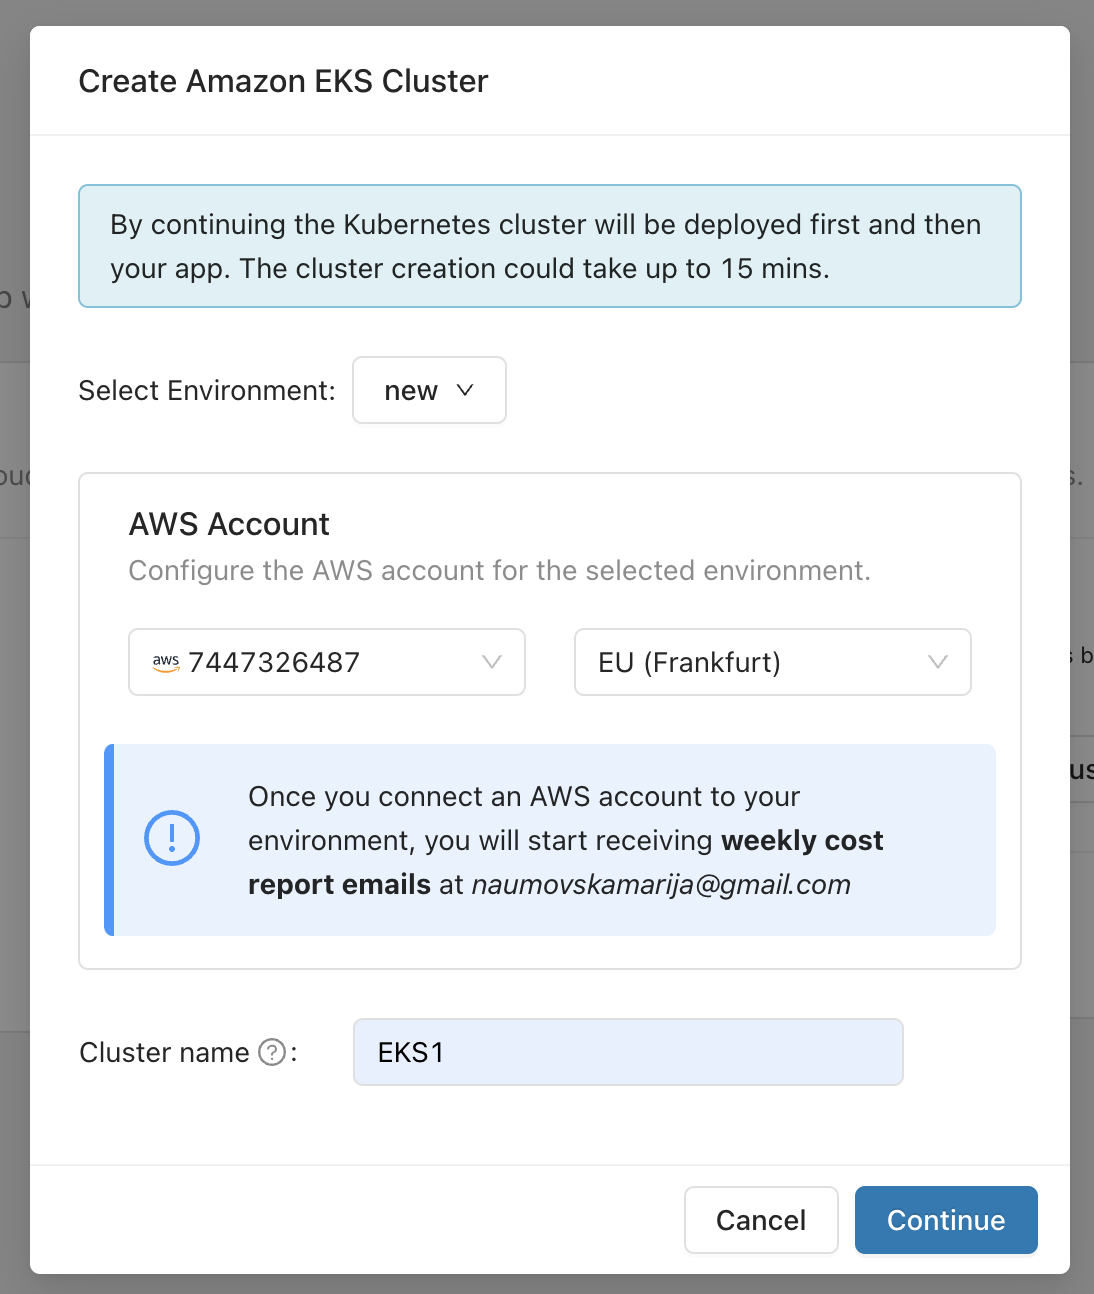
This opens the popup shown in the image above. Select the environment where you want this cluster deployed. If you don't have an existing environment, create one by selecting Create Environment from the dropdown menu.
Once you select an environment, select an AWS account and region where the EKS cluster deploys. If you don't have a connected AWS account, connect one here by clicking the Connect AWS Account button. This starts a CloudFormation stack that gives Microtica permission to provision infrastructure on your AWS account. Once you create the stack, the connection is established automatically, and the AWS account appears in the dropdown list of accounts.
Select the account, select a region, then click Deploy to start deploying your environment.
Deploying a new Kubernetes cluster on your AWS account can take up to 15 minutes.
4.2. Connect an existing cluster
You can also connect an existing Kubernetes cluster and deploy your applications there. Connect Kubernetes clusters running on almost any cloud provider or on-premise. By connecting a cluster, you get the full capabilities of Microtica's Kubernetes automation.
To connect an existing Kubernetes cluster and deploy your Node.js application there, follow the documentation linked below.
5. Deploy the template to your cluster
Once you've selected the cluster, trigger a deployment of the environment by clicking Deploy.
It takes approximately 4–5 minutes for this application to deploy on the cloud. Meanwhile, follow the detailed deployment logs by clicking View Logs.

6. Access the application
When the deployment finishes, click View Applications to open the Apps tab inside the environment. Here you see all your live applications deployed and running on the cloud.

Select your Node.js application to open the overview page with basic information about the app. Click the domain field or the Visit button to preview your application live in the browser.
For more information, check the Deployments and Monitoring tabs, which show the pipeline history, resource consumption metrics, and logs for your instances.
Optimize AWS cost
To save costs while using Node.js in a non-production environment, run it from Monday to Friday, 8 hours per day. This schedule can cut your cloud expenses by at least 65%.
In the Resources or Cost Dashboard, create a Saving Schedule to apply these cost-saving measures.

Next steps
Database administration
Copy the n8n SQLite database to your machine and connect to the Postgres database locally using kubectl, so you can inspect and manage n8n data.
Import an existing Node.js application
Connect your Git repository and deploy your existing Node.js backend on your own AWS account with Microtica's automated CI/CD and Kubernetes setup.